December 2011

Tuesday, December 27, 2011

(Digital) Scrapbooks and Memories

As the year draws to a close, we've had our fair share of happy and memorable moments. (Not to mention loads and loads of photos in our hard drives....) so what would be a good way to commemorate and re-celebrate each of those moments again? How about scrapbooking? Better yet, digital scrapbooking!

Yep, I love scrapbooking! As I child, I would cut out photos and turn them into collage sheets. Unfortunately, time ages materials and I've grown weary of cutting and buying scrapbooking materials that I get to use only once. Good thing Sundrenched introduced me to Digital Scrapbooking! Now with the advent of technology, we can fully customize and create beautiful scrapbook layouts. We can share them online or even print them as glossy Photobooks!

Digiprint can turn your scrapbook pages into coffee table hardbound photobooks. These are especially good for wedding and baby albums because these are printed on acid free paper, so you'll know it won't fade as the years go by.

I personally love digital scrapbooking because it allows me to be creative and at the same time, I can help sustain our environment by not having to cut and paste actual paper. The digital elements can be resized and reused for future scrapbooking projects!

Here are some of my personal scrapbook pages:

Here's a scrapbook page of my Lolo's 70th birthday party.
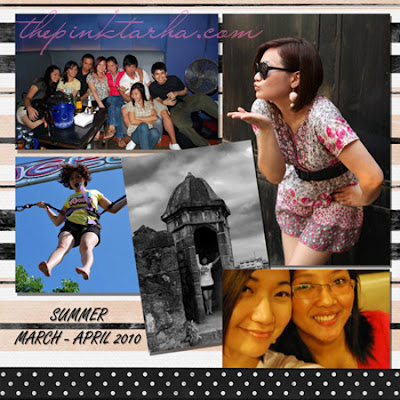
Some highlights of my trip to Manila that year
Photos of The Singapore Flyer

Some memorable photos at Sentosa

So? Are you ready to make your own Scrapbook layouts? How do you do this? First you'll need the following:

1. Computer know-how (Photoshop, Illustrator or MS Powerpoint will work but I personally use Photoshop because it gives me more control over effects, layers and image size. Note: If you use MS PowerPoint, the image output will not be as crisp and clear as it would if you used a dedicated photo program like Photoshop or Illustrator. So if you already know how to use Photoshop, I would suggest that you practice with that program. I'll try to make a separate Photoshop tutorial as well.

2. Digital Scrapbook Elements (there are tons of freebies you can download online. Here are some websites to get you started: Smitten Blog Designs, Peppermint Creative, Raspberry Road Designs. They also have even better kits for sale for low prices.)

3. Photos that you want to re-cherish! 

Getting started:

First thing you should do is look at Scrapbooking websites and download the kits that you like. Try to visualize what motif you want for your scrapbook page and what photos you want to include. Once you've downloaded your digital scrapbook elements and digital papers, you're ready to go! In this example, I used a freebie kit from Smitten Blog Designs, a stock photo of some random family and MS PowerPoint.

Sample Scrapbook Page
I personally like my scrapbook pages square. If you want to do the same, just set your paper size to 8x8 inches (click design; page setup; then input the desired size on the fields for height and width).

Resize your "canvas"
I then pick out the photos and elements that you want to use. Choose a background "paper". I like to layer prints so I usually pick 2 background papers.

Add all the photos and elements you want in your scrapbook page.
Now arrange and resize the photos, papers and elements to suit your taste. This is where your creativity can run amock! Though in my opinion 1-3 photos are easier to layout. Hehehe...

Layout and layer as you see fit.
Once you have the general layout, you can start adding shadows to give your scrapbook a layered feel. You can do this by double clicking on a photo or element until the "format" tab appears on the toolbar above. Then click on Picture Effects and then choose an effect that you want to use for that particular photo. You can also add your own words on the scrapbook page.

Add some shadows
Once you're done and you want to share your creation online, just save your work as JPEG and upload it. Or you could save it and have it printed as a glossy coffee table book at Digiprint in the Philippines. 

Don't forget to save!
There you have it, a basic guide to digital scrapbooking! So what are you waiting for? Let the creative juice flow and start sharing those wonderful memories :) 

L-O-V-E,
Sampaguita Pride 

Sunday, December 18, 2011

Coron: Paradise Found {1/3}

When OFWs and expats come home to the Philippines for vacation, we usually spend most of our time with our family and friends in our hometown. There are some, like me, who use the time to explore the other provinces of the Philippines and travel like there’s no tomorrow. I find it liberating, especially after being stuck in Riyadh for a year (not that it’s too much of a bother; believe me, I rarely complain of my life in Riyadh), and fun because I get to spend quality time with my friends who I missed so much. I think it’s a good way for OFWs and expats to unwind. You will not see these scenes in other countries. Only in the Philippines talaga!

This vacation, I tagged along with my college friends to Coron, Palawan. We spent more or less 8,000 pesos in this journey. Just 800 riyals to see paradise? Count me in! And after I tell you what went on with my adventure in Coron, I’m sure you’ll be inserting it in your itinerary on your next vacation!  I hope this travel entry can also encourage our foreigner friends to visit the Philippines. I tell you, Coron that took my breath away. Hindi pa ako nakakauwi, gusto ko nang bumalik!

This Coron journey started a few months before the real trip. My friends kept tab on airline promos, which make air travel from one province to another so affordable. They saw a  fare promo that fit their budget… P2,700 to go to Busuanga, Palawan, the gateway to Coron. So goooo! They told me about their plan a few months after they bought their tickets (they didn’t know I’m going home on November). They have also booked a package (accommodation+food+tour) in one of the lodges in Coron for P4,500 per person. How can I say no to such inexpensive deal? I’M INNNN!

TIP: Here are the sites of low-cost airlines flying to Busuanga: Cebu Pacific Air and AirPhil Express. Make sure to sign up in their newsletter so you receive email alerts when they go on sale. CebuPac's SMILE Magazine is also a good read. You'll be enticed to book to other provinces and other South East Asian countries pronto!

Back to my story... We’re taking an early flight via Airphil Express, one of the budget carriers in the Philippines at the NAIA Terminal 3. It's a relief that we're using Terminal 3 now. It's cleaner, wider, and more well-lit than the old NAIA terminal, which huge international carriers still use. There were a lot of people but checking in was a breeze.

Our flight *excited much*
A mini bus had to take us to where the airplane was parked. We're using a Bombadier Q400 for this flight. The plane is a little bit small, my first time to ride something like it. The weather is fine and we were in the air in no time at all. Snacks are not served for free but you can buy them from the attendants. They’re too pricey so better eat in the airport if you’re hungry.

[For some reason, the photos which should be vertical are automatically made horizontal by the settings of my laptop/system. I will correct them soon. Thanks for reading! :)]

The view from my window... still on the ground.
The inside of the aircraft

G'bye for now, Manila!

A welcome sight to the last ecological frontier of the Philippines!
We arrived in Busuanga on time. For a little bit of info on the island, head on over to this link. Busuanga is the largest island in the Calamian group of islands. This is the jump off point to Coron.

Landed on a clear, sunny day

Arriving at the Busuanga airport

The Francisco B. Reyes Airport, named after a mayor of Coron during the Commonwealth era and located in the Yulo King Ranch, is small and the process is no-fuss. We got our luggages and head on out the door. A van from the Ralph’s Lodge, where we’ll stay is already waiting for us. Travel time from Busuanga Airport to Coron town proper is 45 minutes. Views of hills and meadows will greet you while passing through the ranch, one of the largest in the Philippines. The sceneries are so serene and laidback. You’ll be glad to see the cows and horses grazing in the road side and just lounging around looking so lazy but serene.

I was already inhaling deep and pinching myself. Am I really here? How did time fly by so fast? From the desert to the meadows… how very interesting! Well, it does get more interesting in the days that follow so make sure you visit The Pink Tarha site again in the coming days. 

This view gives a glimpse of what awaits...

And before I forget, (advance) Merry Christmas po, mga kabayan!

Sundrenched (blogging from MNL)
Related Posts Plugin for WordPress, Blogger...